Welcome back to Tactical Tennis after the unplanned hiatus! In Part 1 of this series we learned about the importance of reducing errors, and how to do so by utilizing the cross-court ball. In Part 2 we examined the dangers of introducing change to the ball – adding or subtracting pace and changing direction, height or spin. In today’s article we are going to go over what I’ve dubbed the traffic light system of offense and defense. The traffic light system is really all about understanding whether to be offensive or defensive based on your positioning in the court. Why is this important?
While introducing change to the ball increases our chances of making an error, there is a far more pervasive source of errors among tennis players. Too often players make one of two classic mistakes: they either try to play aggressively from a position of weakness, or they play defensively from a position of strength. This typically stems from a very poor understanding of the risk vs reward for their current position. And ultimately, when we play tennis that should be the measure by which we make our decisions – risk vs reward. We are, in effect, gamblers. Every shot we play in tennis has an associated risk, and often as not, between relatively evenly matched opponents the player who manages his risk vs reward the best will win the match. This is a concept we’ll expound on further in another article, but for now suffice to say the basic concept here is we want to play according to our position on the court, and the traffic light system will help us understand when to do that.
The Three Zones (Or Lights)
The concept itself is simple: we split the court into three zones – red, yellow and green – and choose defensive, neutral or offensive shots based off where we are standing. I’ve put together a simple image to give a visual idea of the concept below:
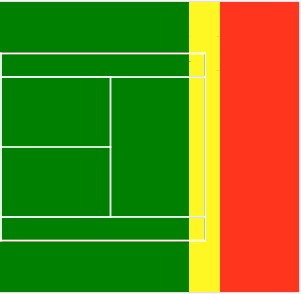
The Red, Yellow and Green Zones
Pretty simple right? Red means stop, yellow means proceed with caution and green means go. When standing in the red zone we should primarily focus on hitting the ball deep cross-court. In the yellow we should play either a neutral or attacking ball depending on our opponent’s quality of shot and our own strengths and weaknesses, and then in the green we are in position (most of the time) to attack. However it is important that we understand why we should make these choices – after all without knowing the reason behind the rules we can’t make good decisions as to when to break them! As we do so there are two important caveats:
1) The zones apply primarily to baseline to baseline play – once either player comes to the net all bets are off
2) The zones shift by as much as several feet from player to player, so we’re going to examine the zones as they apply to most everyone except the top pros
With that said, let’s take a deeper look at each zone and what drives the decisions we make in them.
The Red Zone
For most players the red zone begins 2-3 feet behind the baseline and extends to the back fence. When in this zone our typical shot should be high over the net, aimed to be deep and cross-court from our current position. Playing offensively from this position is typically a losing proposition. Why you ask? Because typically players attack in one of three ways: hitting the ball hard, hitting the ball with great angle, or hitting the ball down the line. The deeper you stand when you hit the ball, the longer it takes to get to your opponent. This blunts any power you might add to your shot, and when we start talking about risk vs reward you are increasing your risk a lot for minimal reward. Similar logic applies to a down-the-line ball. Hitting from deeper your opponent has more time to move across and cover their line, and as we spoke about in Part 1, you’ve played yourself out of position for very little reward. Finally the deeper in the court you stand, the harder it is to hit angles. Attacking with angles from deep positions is exceedingly difficult and fraught with peril!
On television you might and probably will see the likes of Djokovic, Nadal and Murray smoke winners against their opponents from positions five, six feet behind the baseline. For the top level pros the yellow zone extends deeper than for the average player because of the sheer pace and spin with which they hit. These players can still hurt their opponents even when deep behind the baseline, and the level of spin they use allows them to create angles not available to a typical player from those kinds of positions. However what is worth noticing is what even the top pros do most of the time in these types of positions. If you watch, and especially if you listen to top players talk about court positioning they recognize what a problem it is to be playing from too deep behind the baseline. Even the best have red zones, and they want to avoid being in their red zone as much as possible.
The takeaway: when in the red zone, play for position. Strive to play a safe shot that pushes your opponent into their red zone from which they are unlikely or unable to hurt you. Above all else, don’t make errors in the red zone. You can’t win the point from the red zone, so try your best not to lose it from there making a rash error.
The Yellow Zone
The yellow zone is really a place of transition, which is why it appears so narrow in the graphic above. It extends a few short feet either side of the baseline, and generally speaking we don’t want to remain in the yellow zone for too long. Doing so means we are either taking up poor position off our own weaker shots, or that we are not taking advantage of opportunities to attack. So what sort of shot should we strive to hit from the yellow zone? Generally speaking we are looking to attempt controlled aggression. If I’m standing in the center of the court in the yellow zone and my opponent hits the ball to my strength, I might choose a more aggressive shot. If I’m on the run in the yellow zone hitting with my weaker side, then I would choose a more passive or defensive shot.
The things to take into account when hitting from the yellow zone are:
1) The quality of the incoming ball. Even if I’m in the yellow if my opponent hits an exceptionally hard or heavily spun shot I might want to be a little more passive or defensive off it, whereas a weak shot should be punished.
2) Your own balance. Are you hitting on the run? Are you falling off your back foot? If so moderate your choices accordingly.
3) Your opponent’s position. If they are in great position, don’t force play too much. Making an error trying for too much when you were unlikely to truly hurt them anyway because of their position is poor risk management. Likewise if they are out of position, take your chances.
The takeaway: Yellow means proceed with caution for a reason. There are opportunities to be had here, but use wisdom. Don’t try to end the rally with one shot from the yellow zone, and proceed to the net from the yellow sparingly because you have a long distance to travel for a putaway volley.
The Green Zone
Finally you’ve earned that short ball. This is typically your chance to attack with little reservation. Standing short in the court means your opponent has less time to react, and less time to move in order to reach your shot. You have access to greater angles, and the down the line from high in the court will hurt your opponent greatly, especially if you come to the net behind it.
A word of warning however: beware the low shot in the green zone. Federer used to use his backhand slice to play the ball short and low, drawing players into awkward position. Unskilled players can do this by accident with mishits or poorly timed shots, and crafty players will do this with intent. When your opponent pulls you up into the green zone with a short, low ball attack carefully. Your best play is typically to slice the ball low and come in behind it. If that particular set of tools isn’t in your toolbag, a decent option B is to float the ball deep cross-court and retreat to the baseline. Being overly attacking off this ball is the sucker’s bet.
The takeaway: Attack from the Green Zone, but do so with prudence. Attacking includes more than just attempting to hit a winner – playing your opponent out of position and coming to the net is an example of another valid form of attack!
The Importance of Transition In Point Building
One of the big concepts to take away from today’s article is the importance of transition. If you find yourself in the red zone during a point, your goal isn’t to win the point from there. Instead the goal is to transition out of the red zone into the yellow zone. We do this by playing smart, not making an error, and forcing our opponent into his or her own red zone. The deeper they are, the harder it is for them to attack me and also the more likely they are to land a ball short.
Once in the yellow zone, don’t think about ending the point. Instead look to attack enough to earn yourself a ball in the green zone. You can do this by making them hit on the run, but hitting with greater pace, spin or angle. The key thing here is to try to earn yourself better court position and to transition to the green zone.
Modifying For Your Game
Remember at the beginning when we said it was important to understand the rules so you know when to break them? Every player has strengths and weaknesses. If I have a cannon for a forehand and a weak backhand, I want to modify my zones slightly depending on which shot I’m hitting. On the forehand, the yellow zone extends deeper into the court and my red zone shrinks. On the backhand my red zone might extend higher in the court and my green zone shrinks. When you’re first starting to apply the traffic light system to your game, you may want to make little to no modification, but over time you can tweak and adjust to your own strengths and weaknesses to get the most out of the tools you have available.
Conclusion
Keeping the zones in mind when playing is critical to managing your risk vs reward. Trying to hit an inappropriate shot for their current court position is a major source of errors for most players, and it is those very errors that hold them back and keep them playing at a level lower than their potential. So just remember when you’re on the court: red means stop (attacking), yellow means proceed with caution and green means go. Work hard to transition your way out of the red zone with depth and patience, not power. Apply your own strengths and weaknesses to the concept and tweak it so you’re not taking unnecessary risks with your weak side, or wasting opportunities with your weapons.